
While, for the most part, MS Paint is a simplified version of many complex graphics tools such as Adobe Illustrator, the basic concepts are very similar, and you can start your graphics design journey by learning and practicing on Microsoft Paint.
That being said, here are the simple steps you need to follow if you want to learn how to resize an image in paint.
In this step-by-step guide, we will review how to resize an image in Paint. The steps are as follows:
1) Load your image
2) click the resize option
3) resizing the image based on the values.
Total Time: 2 minutes
Table of Contents
Load the Image You Want to Edit

You need to load the image file you want to manipulate. This can be done by:
Clicking on the button labeled File at the top left corner of your window.
On the drop-down list that appears, click on the second option or the option labeled Open, which will pull up a window that offers you options from where you can fetch the image file on your computer.
After that, simply find the image you want to resize in your hard drive and open it to load it onto the MS Paint program.
Click the Resize Button

Once your image has been loaded onto the program, you should see it in place of what was a blank space; the image you want to edit should be the one dominating the program window.
After that, click the Resize button, which can be found near the File button on the upper left corner of your window.
Steps to Resizing Image on Paint by Percentage
You will see a box labeled Maintain Aspect Ratio, which is just below the Vertical option on the drop-down file menu window. Ensure that this box is always checked; otherwise, it will distort your image as you work on it.
However, if you want to change the Horizontal and Vertical variables independently, that Maintain Aspect Ratio box should be unchecked.
Now, in our image, let's say you want it to be smaller than the original image and want to resize the original image by a specific percentage. All you have to do is click the resize button and put in whatever value you want to change the image by.
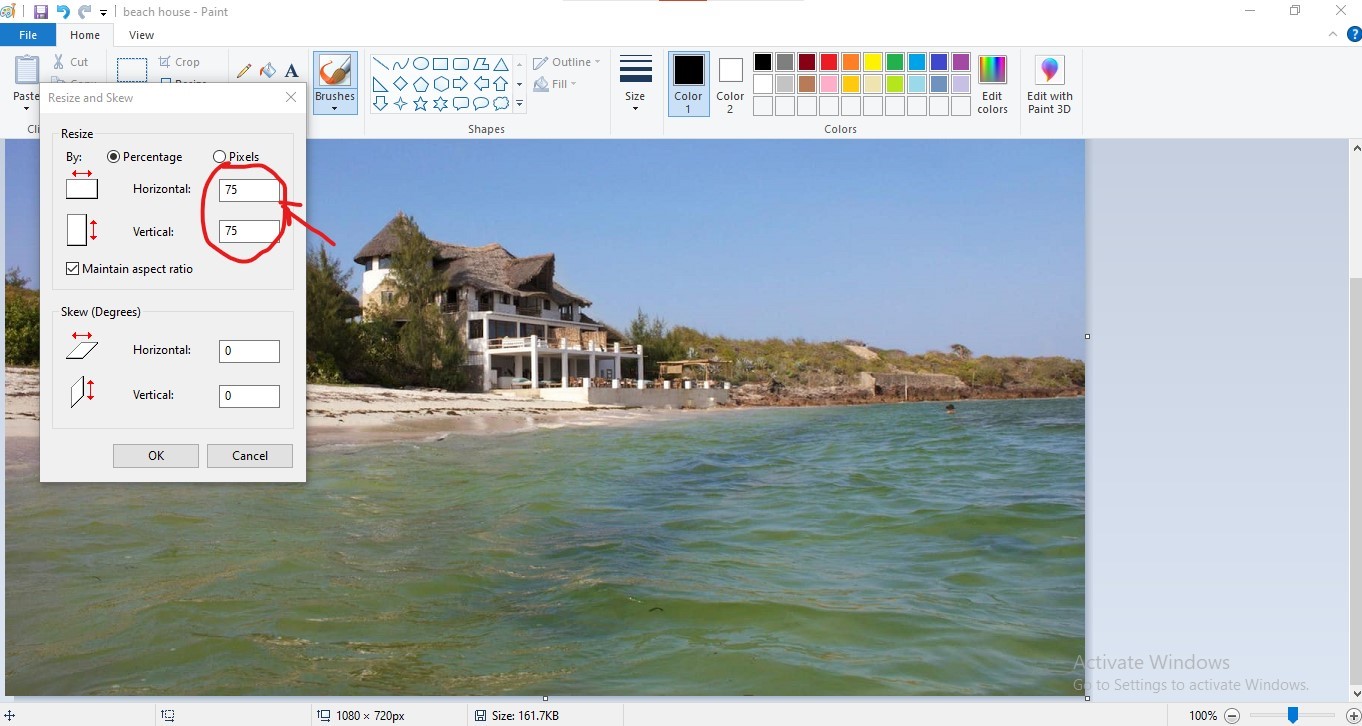
Let's say, for example, we want to be at least 75% smaller than it currently is, then all we have to do is input the value 75 into the Horizontal box like so:
As you can see, since we have the Maintain Aspect Ratio box checked, the Vertical value automatically changes to 75% to maintain the image's aspect ratio.
Remember always to save your edited images once you are done resizing them and preview them. This step is fairly simple:
-Click File
-Go to Save As
-Choose image type .jpg, .bmp etc.
-Save the file in your selected folder
Steps to Resizing Image on Paint by Pixels
Resizing your image by pixels follows pretty much the same steps. Only this time, instead of the Percentage option, you will click on the Pixels option.
The same is the case with the Percentage option. If you check the Maintain Aspect Ratio box, whatever change you make on the horizontal value, the program will automatically change the vertical value to maintain the image's aspect ratio.
After that, simply go through the same steps involved in saving the image before moving on to the next project. And there you have it. You know how to resize an image in Paint.
As you can see, this is a rather straightforward process that mimics a great number of the more advanced graphic design tools on the market today.
You can do so much more with MS Paint; the host of options on its top toolbar gives you a glimpse of how robust this program is in the right hands. For now, however, you know how to resize an image in MS Paint, and that's as good a start as any.
The beauty of it all is that you can experiment with the project without doing any major damage to your computer or the images in it.