Creating artboards in Photoshop is a great way to work on multiple-page design projects, such as business cards, flyers, or brochures. The feature is also a great way to compare various colors or design choices on one design or photo by comparing multiple versions side-by-side.
However, when you first want to create an artboard in Photoshop, learning how these elements work can be confusing. Learning how to create artboards and add an extra artboard to the workspace is especially confusing.
Table of Contents
What Are Artboards in Photoshop
When working in Photoshop, you work on one canvas in the center of the workspace by default. This canvas is shown by a block at the color and size you set when creating a new document.

However, you also have the option to open multiple canvases in the workspace to work on various documents at the same time. These are known as artboards and can be created and adjusted in the same manner as a canvas.

You can add layers to each artboard and work on these individually without affecting elements on the other artboards. You can do anything on an artboard that you usually would on a canvas. Each artboard has its own group containing the layers in the Layers Panel.

Artboards are helpful as you can design double-sided designs, such as business cards or flyers, multiple-page designs, such as a brochure, or even just change the colors on a single design or image to compare variations.

After working on artboards, you can save the different artboards in one PDF or as separate image files.
Overview of How to Create an Artboard
- Click on New File
- Set your canvas dimensions and check the Artboards option
- Change the artboard size in the top settings bar if needed
- Activate the Artboard Tool (V)
- Click on the Add New Artboard icon
- Click and drag to draw a custom artboard
- Click on a plus sign icon to add a new artboard at the same dimensions
- Add more artboards as needed
- Duplicate artboards containing objects
Step-by-Step of Creating Artboards in Photoshop

The best way to create artboards in Photoshop is to set your document to artboards when you first create a new document. You can add extra artboards of the same or different sizes throughout your project.
Click on New File

To create an artboard file, open Photoshop and click on New File from the Home Screen. You can also go to File > New or press Control + N on Windows or Command + N on Mac if you already have a project open in Photoshop.
Set Your Canvas Dimensions and Check the Artboards Option
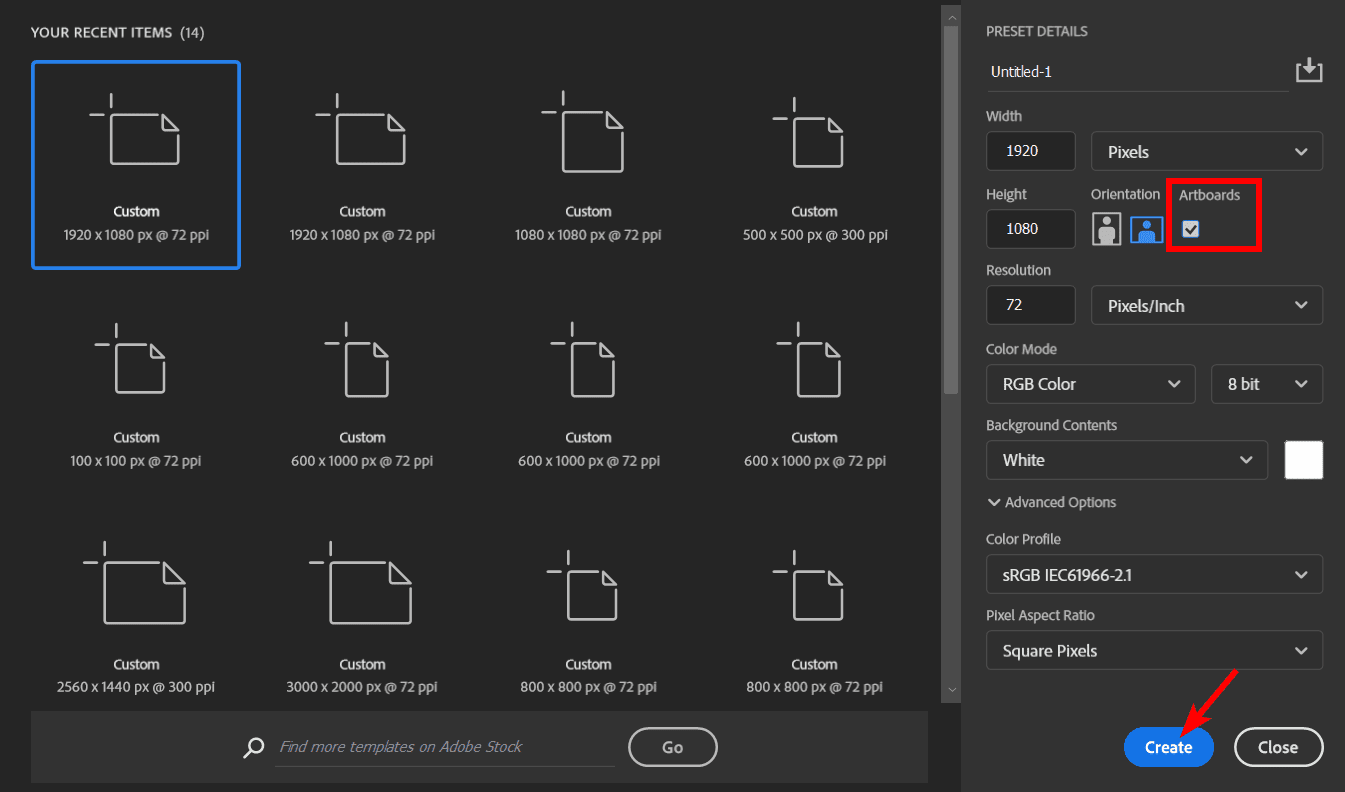
In the New File panel that opens, select a template for the artboard size, or add your own width and height dimensions. You can set all the other settings, such as the resolution, color mode, and more.
The important setting to change is to check the box below Artboards. This will create a document with an artboard. Click Create to open the new document.
Activate the Artboard Tool (V)
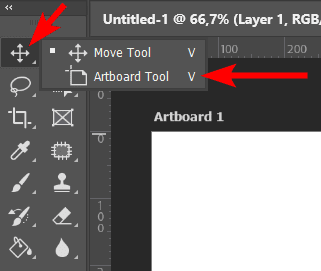
The document will open in the workspace as one artboard. You need to activate the Artboard Tool to edit the artboard, such as changing the size or adding more artboards.
You can access this tool by clicking and holding on to the Move Tool until the menu pops up, where you can select the Artboard Tool.
Change the Artboard Size in the Top Settings Bar if Needed

If you change your mind about the size, you can quickly change the document size using the width and height boxes in the top settings bar or the drop-down menu to change it to a fixed template size. I changed mine to a 1080 x 1080 pixel square.
Click on the Add New Artboard Icon
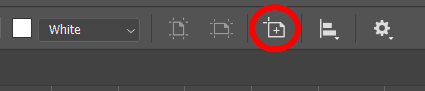
There are two ways to add a new artboard in Photoshop. The first method is to click on the Add New Artboard icon located in the top settings bar.
Click and Drag to Draw a Custom Artboard
Once you click on the Add New Artboard button, you can click and drag to create a custom-sized artboard anywhere in the workspace.
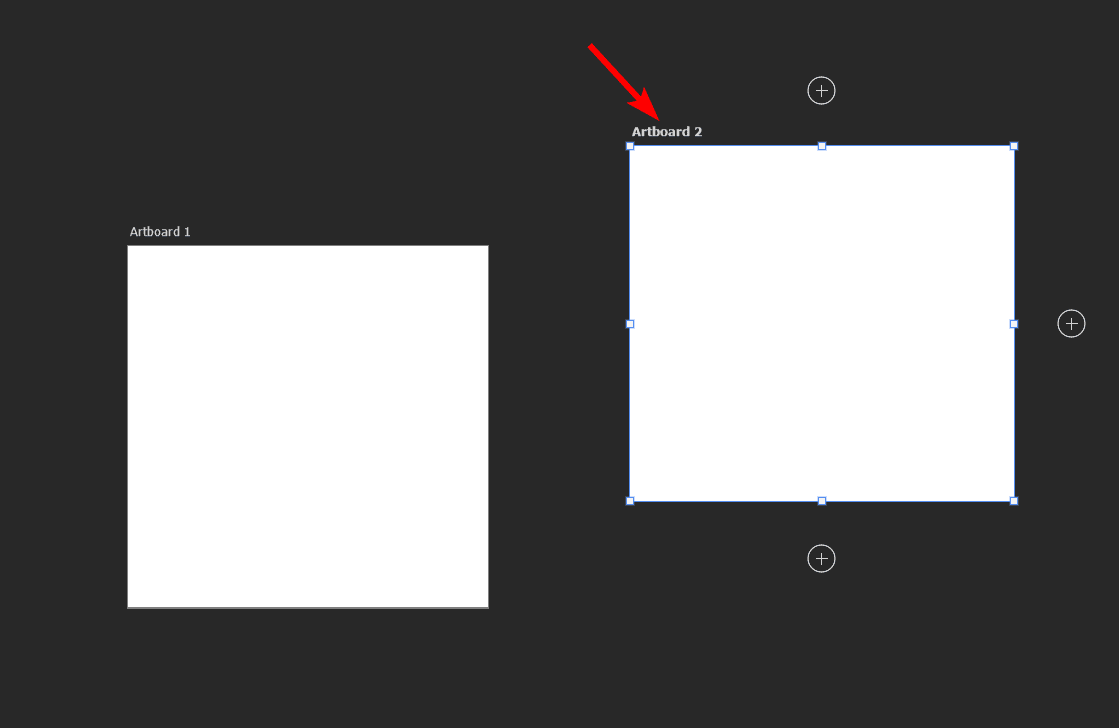
Click on a Plus Sign Icon to Add a New Artboard at the Same Dimensions
If you want to create a new artboard of the same size and dimensions as the original artboard, you can click on any of the plus sign icons next to the original artboard. This will add a new artboard to that side of the original artboard.
Add More Artboards as Needed
You can then use these buttons to add as many new artboards as you need for your project.
Duplicate Artboards Containing Objects
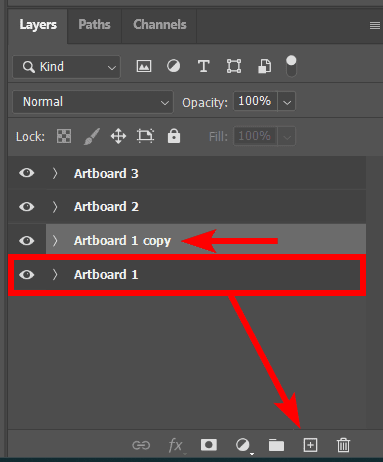
If you have an artboard with a logo design or other objects, you can duplicate the entire artboard, which will copy the layers as well as the artboard.
You can do this by selecting the artboard group in the layers panel and dragging it to the Add new layer icon, or you can select the artboard and use the shortcut Control + J on Windows or Command + J on Mac to duplicate the artboard.
The copied artboard will appear above the original one and have "copy" added to the name.
Tools:
- Photoshop
👍 Support Us: Subscribe to our channel and help us continue providing these tutorials.
🌟 Regular Updates: We publish how-to videos for Photoshop regularly!
🔧 Expert Guidance: Learn Photoshop from our professionals and uncover exclusive tips!