FireAlpaca is a photo-editing and free illustration application compatible with both Windows and Mac. Many people use FireAlpaca when starting in the digital art sphere, either as a hobby or a career.
If you’re just getting into the field, it makes sense to know what tools are available. Two important things to learn right off the bat are how to add color as well as how to invert colors.
This article will show you the steps required to add color to any project and also invert your preferred color scheme.
Table of Contents
How to Invert Colors in FireAlpaca
The process of color inversion in FireAlpaca is pretty straightforward.
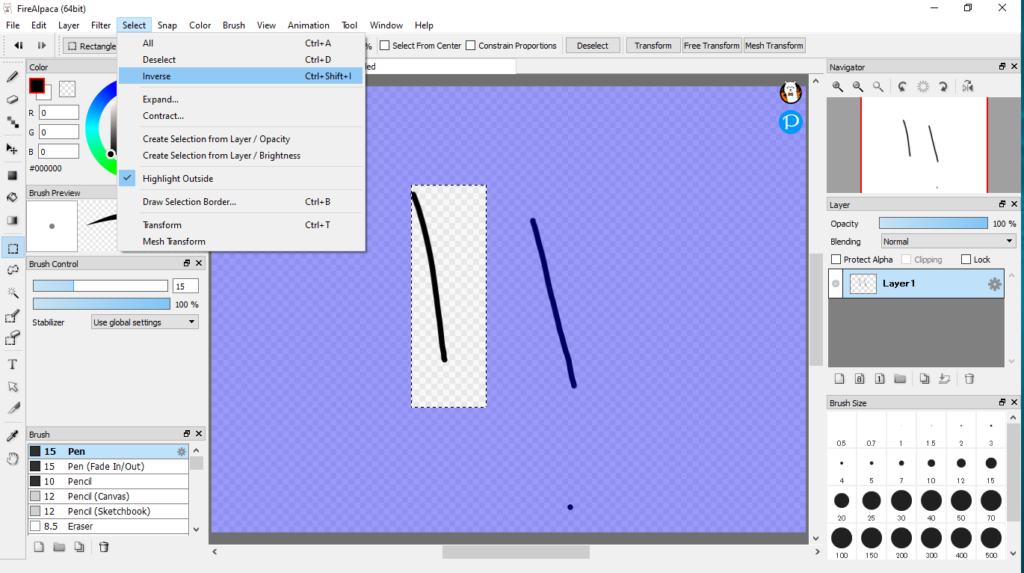
- First, select the area you want to invert
- Click the Select menu at the top
- Select Inverse
Alternatively, you can use the keyboard shortcut by pressing Ctrl + Shift + I simultaneously for inverted colors.
How to Set Up Your Project to Invert
Setting up your project to invert image color requires creating a new file. To do this:
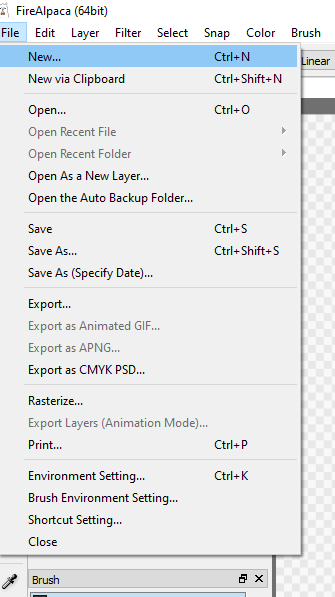
- Click the File menu at the top of the application window
- Select New… to create a new file for invert selection
Alternatively, you can use the keyboard shortcut, Ctrl + N.
Once you have done that, a dialogue box opens for you to select your file specifics. You can choose a background color, set image size, and do a lot more from the dialogue box. Depending on your project, you don’t have to do much with the settings. In most cases, you can simply use the default settings.
The default settings are standard, with the default background being a checkerboard pattern. However, you can choose to change the background if you so desire.
Next, you can begin your project by drawing an outline or whatever it is you want to do. Use the pen tool or any other brush tool to create the outline.
For best results, a darker tool like a pen is usually recommended. This will display better even on projects that use transparent background layers.
Follow these steps once you’ve set your file specifics:
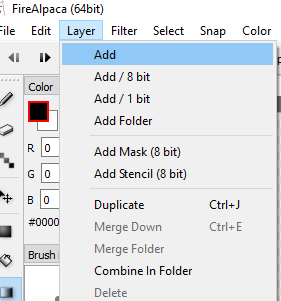
- Click the Layer menu at the top of the FireAlpaca window
- Select Window and click Layer
- Next, click the add option from the dropdown menu to create a new layer
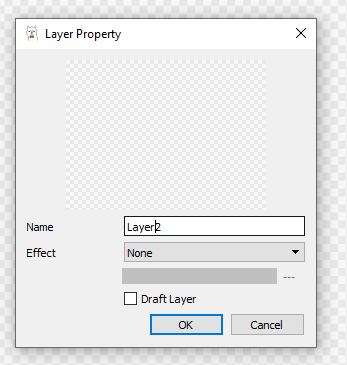
Next, you want to name your layers. Although this step isn’t crucial, it is usually a good idea to name multiple layers so you can keep tabs on them and stay more organized.
To name a layer:
- Double-click the layer
- Enter your preferred name for the new layer
- Click OK to effect the changes
Once your drawing has been moved to the final layer, you should clear the lines.
To invert color, you first need to add color. The two ways to add color in FireAlpaca are using the Magic Wand tool and the Bucket tool.
To use either of these tools, your lines need to be connected. If you do not connect your lines, the application will not recognize where the background begins and where the image ends. You might need to zoom in a bit to ensure there are no breaks in your lines.
Next, delete the outline layer before you invert screen colors. To do this:
- Click the Layer window
- Locate the outline layer
- Click the Layer menu at the top of the application window
- Select Delete to remove the outline layer
How to Use the Magic Wand Tool to Add Color
Here’s how to use the Magic Wand tool to add color to your project:
- Click on the Magic Want tool from the grey selection bar on the left of the application window. The Magic Wand tool icon resembles an exploding firework.

- Click on any area outside the drawing. This will highlight the entire drawing.

- Next, create another layer by clicking the Add option from the Layer menu. Remember to name the layer for easy identification
- Drag the newly named layer below the current one
- Next, select the pen tool from the grey selection bar. Using the pen tool is an important step as you could end up distorting your drawing if you try to draw when the Magic Wand is still active
- Click the Window menu at the top of the FireAlpaca screen and click Brush
- Select your preferred custom brushes from the list of available options in the Brush window
- Click on the Window menu again and select a color from the Color submenu
- Choose a color from the Color window
- From the Select menu, click Inverse for color inversion
How to Use the Bucket Tool to Add Color
To use the Bucket tool to add color:
- Click the Window menu
- Select the Color option from the dropdown menu
- Pick a color from the color wheel in the Color window
- Click on the Bucket icon from the grey selection bar to activate the tool. The icon resembles a tipped bucket.

- Next, select the image or drawing you want to paint. Make sure the lines are connected so the section will be completely covered with the paint.
Adding color with the Bucket tool might leave a gap inside your drawing if you use a thick outline. If this happens, you can use the Pen tool to clear up any lines.
Conclusion
The process of inverting colors in FireAlpaca is extremely simple. You only need to highlight the section and layer of your project you want to color, apply your preferred color to the selection using the Magic Wand or Bucket Tool, and then invert the color using the dropdown option available on the Select Window.
👍 Support Us: Subscribe to our channel and help us continue providing these tutorials.
🌟 Regular Updates: We publish how-to videos for FireAlpaca regularly!
🔧 Expert Guidance: Learn FireAlpaca from our professionals and uncover exclusive tips!