You can use FireAlpaca to create quick animations for your projects.
Suppose you are looking for a program to create animations you can use for professional projects. You will need to consider Adobe Animate or Procreate, to name a few.
However, if you want a quick and simple animation, follow these easy steps to learn how to animate in FireAlpaca.
With practice, you can use the program to create more complex animations that bring your illustrations to life.
How to Animate in FireAlpaca
- Create a New Document at 1920 x 1080 Pixels
- Activate the Animation Mode
- Draw the First Piece of the Animation
- Add a New Frame to the Animation
- Add a New Drawing Next to the previous Layer
- Repeat the Steps to Create the Rest of the Animation
- Preview Your Animation Using AutoPlay
- Adjust the Frames Per Second Rate
- Export the Animation as an Animated GIF
- Set the GIF Settings
- Test the GIF
Animation is usually a complicated technique. However, FireAlpaca has simplified the process to help you make simple animations and GIFs in only a few steps. You can draw the content for each frame and determine how fast or slow the animation will be.
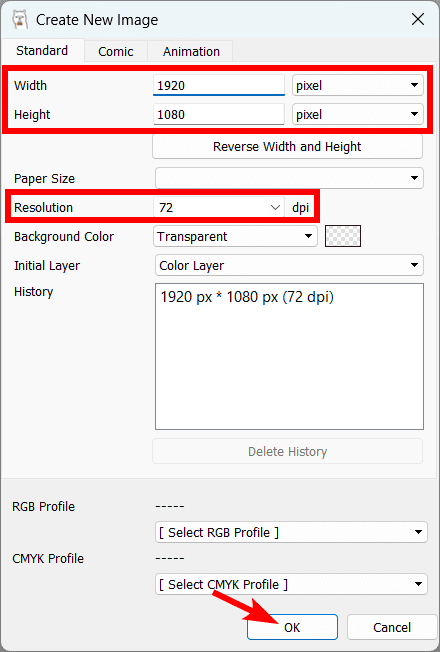
Create a New Document at 1920 x 1080 Pixels
First, you need to create a new document at a standard video size. You can use a different size for GIFs if you want.
To create a new document, use the shortcut Control + N on Windows or Command + N on Mac. Then insert 1920 pixels in the width box and 1080 pixels in the height box and set the Resolution to 72 dpi. Click OK to create the document.
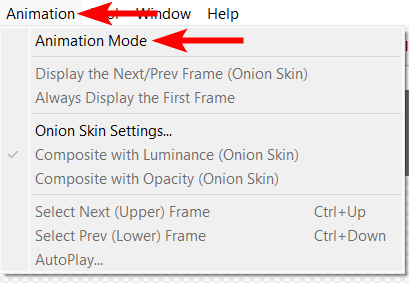
Activate the Animation Mode
You need to turn on the animation mode to start creating the animation. In the animation mode, you will work with the onion skin feature to create the various frames for the animation. The onion skin shows a semi-transparent image of the previous frame as you draw the next frame. To turn the animation mode on, go to Animation > Animation Mode
Draw the First Piece of the Animation
Now, you can begin drawing the first piece of the animation. This initial drawing will become the first frame in the animation, so make sure you complete everything that you want to see in the first frame. I am going to make a simple bouncing ball animation. So I need to draw the first circle where I want the animation to begin.

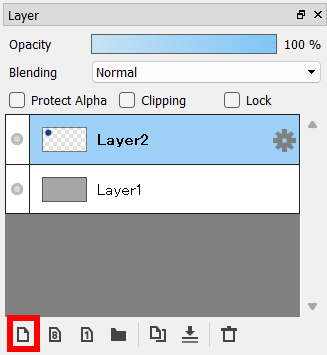
Add a New Frame to the Animation
The layer you drew the initial drawing on automatically becomes the first frame in the animation. Now you need to create a new frame for the next part of the animation. To do this, you simply need to add a new layer to the document and draw on the new layer. To add a new layer, click on the Add New Layer icon at the bottom of the layers docker.
Add a New Drawing Next to the Onion Skin Layer
Once you add a new layer, the previous layer/frame turns into a semi-transparent red color. This allows you to see the positioning of your first frame as you draw the content for the next frame. When you add another layer, only the previous frame is visible as the onion skin object.
If you add a layer between two existing frames, the previous frame shows the object in a semi-transparent red color, and the next frame shows the object in a semi-transparent green color.

Repeat the Steps to Create the Rest of the Animation
You can now repeat these steps to complete your animation by adding new layers and drawing different content on each new layer. Here are the last two frames I drew for my animation.

Preview Your Animation Using AutoPlay
When you have completed the layers you want in your animation, you can preview the animation you have created and decide on the Frames Per Second Rate, which controls how fast or slow the animation moves. To preview the animation, go to Animation > AutoPlay.

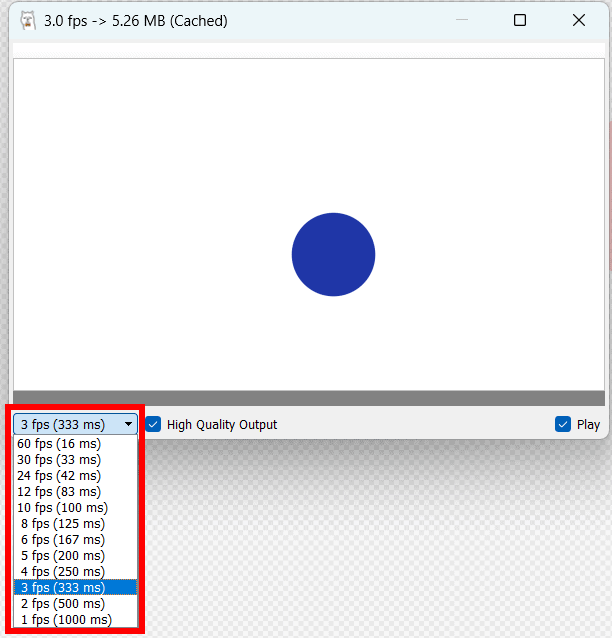
Adjust the Frames Per Second Rate
Once the AutoPlay panel opens, you will immediately see the animation moving. However, the Frames Per Second Rate may be different from what you want it to be.
Use the drop-down menu at the bottom of the panel to choose the best FPS rate for your animation. The more frames per second, the quicker the animation becomes, and the fewer frames per second, the slower the animation.
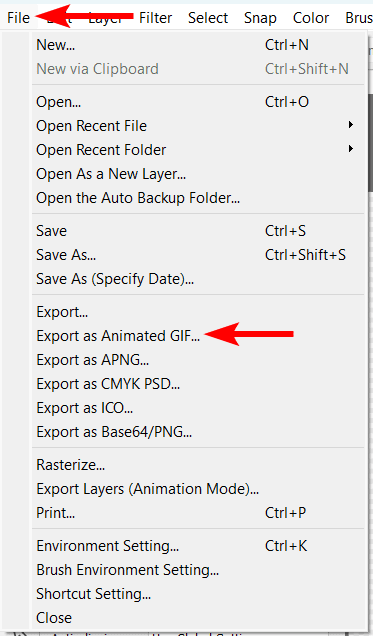
Export the Animation as an Animated GIF
When you have previewed the animation and made any adjustments to the layers as needed, you can move on to export your animation as a GIF.
You could export the frames as separate PNG files and use a different program to create the GIF, which used to be necessary as FireAlpaca didn’t have the functionality to save frames directly as a GIF. However, FireAlpaca now has the function to save the file as a GIF automatically.
To export the animation, go to File > Export as Animated GIF.
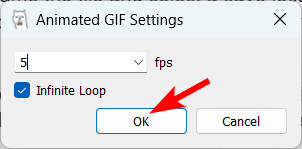
Set the GIF Settings
First, you will be prompted to name the file and select a save location on your device. Then a dialogue box appears, allowing you to set your desired frames per second rate for the GIF.
You can also select whether you want the GIF to play on an infinite loop or just go through the frames once by using the checkbox at the bottom. Add in your settings and click OK to save the file.
Test the GIF
You can now locate the GIF file in the location you saved it. Then open it as you would with an image, and the GIF will start playing automatically. You can now share the GIF on your social media or a web platform.

👍 Support Us: Subscribe to our channel and help us continue providing these tutorials.
🌟 Regular Updates: We publish how-to videos for FireAlpaca regularly!
🔧 Expert Guidance: Learn FireAlpaca from our professionals and uncover exclusive tips!