
FireAlpaca is a user-friendly editing application. The highly intuitive software allows users to create stunning images without any difficulty. It comes with many features that can be useful to users of all experience levels.
Some features include customizable text boxes, effects, and backgrounds, which can be extremely useful for photo processing. It is also possible to use the software’s stickers to highlight pictures on your walls or desks.
FireAlpaca lets you create collages from any number of images. It can also be used to retouch pictures so that they come out perfect. You can leverage the photo editing tools available with numerous innovative features, such as the ability to set colors, merge photos, adjust image saturation and brightness, crop, resize, and apply filters to your digital painting.
We hope our tutorial helps familiarize yourself with the FireAlpaca stabilizer tool, so you can take full advantage of everything it has to offer you as an artist or illustrator.
Table of Contents
What Is the FireAlpaca Stabilizer Tool?
The FireAlpaca Stabilizer tool was previously known as the Correction tool. It is an in-built tool that can be found in the dropdown menu once a Brush tool is selected from the brush window. To make it easy to find, the Stabilizer tool is right next to the Antialiasing tool.
But what exactly is the function of the Stabilizer tool? When the tool is set on a value higher than 0, it can make any lines drawn less jittery and smoother.
Using the stabilizer tool has been known to cause some lag issues with slower computers. This is because the tool requires the program to continuously calculate and make corrections while you are drawing. The Correction tool can be used with just about any brush, even with a brush tool that has been imported into FireAlpaca.
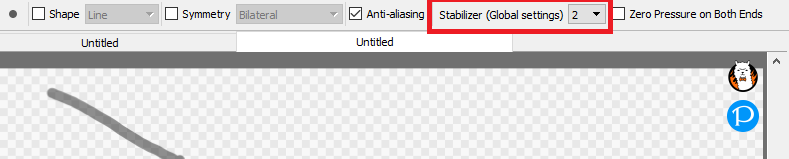
As stated earlier, the Stabilizer tool can be found next to the Antialiasing option when a brush is selected. It has a minimum value of 0 and a maximum value of 40, with 40 providing the crispiest lines. Keep in mind that the higher the value, the longer it takes to draw the lines.
What Are the Recommended Settings for the Stabilizer Tool?
Here are a couple of recommended settings you can use when working with the Stabilizer tool.
- For sketching and drawing, you can use a 0 value stabilizer. This is advantageous for an illustrator that wants natural lines that are as free as possible.
- For lineart, a Stabilizer value of 20 is adequate to work with the lines. Going a little higher than that for lineart could cause the tool to become slightly buggy, even to the point of creating a bump on the line. Most users prefer not to become overly dependent on the Stabilizer tool, especially when creating lineart. Instead, they prefer to create smooth, strong lines using their arm and wrist movements. Relying on the Stabilizer tool too much could make the art appear like a sketch you would find in a sketchbook.
- If you use the tool for effects and coloring, the setting will depend on exactly what you want to do. While you can get by with no Stabilizer at all, the tool can be useful when you require some effects to be extremely smooth, something matte painters can appreciate. In this instance, using the Stabilizer tool is up to you. You can do without the Stabilizer tool if you are an artist that creates pixel art or draw a plethora of dots.
Can You Fix Correction While in FireAlpaca?
While computer programs tend to work as intended most of the time, there are instances when the programs run into issues or bugs that make general efficient workflow tiresome for concept artists. It is these instances that require a bit of a fix.
If you run into some issue with the Stabilizer that needs fixing, the first thing you can do is quit and restart the program.
If that doesn’t work, you might have to restart your computer. If shutting down and starting your computer doesn’t work, you might have to dig a bit into the program to fix the problem.
Go to the File menu in FireAlpaca, locate the Environment Setting, and then alter the Brush Coordinate setting. Set it to “Use Mouse Coordinate” instead of “Use Tablet Coordinate.”
If the issue still isn’t resolved, you might have to simply reset FireAlpaca. Keep in mind that resetting FireAlpaca means that any custom palettes and brushes will be lost.
What Else Can You Do in FireAlpaca?
Apart from stabilizing lines by heading to the taskbar above the canvas area and choosing the Stabilizer dropdown menu, you can also create curves in FireAlpaca.
Here’s the most effective way to do this:
- Select the Curve Snap icon
- Once activated, select where you intend the curve to begin
- Hover over to the area where you want to end the line
- Once at the endpoint, you will get a preview of how the curve will look, which you can alter based on the angle of the curve

You can also alter the pen pressure sensitivity setting in FireAlpaca. It might be surprising to some users that FireAlpaca does have pen pressure. The software actually has great responsiveness, but some users prefer to remove the pressure sensitivity.
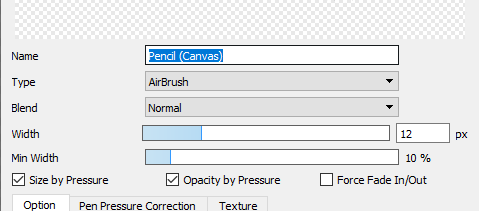
While there isn’t any overall “off switch” to be found in FireAlpaca, you can remove or deselect the pen pressure for each brush stroke. This can be done by simply double-clicking the brush in the brush window on the list. This will enable you to edit the brush’s properties. Unselect the boxes next to the “Opacity by Pressure” and “Size by Pressure” options.
Conclusion
Digital and concept artists searching for a simple drawing and painting tool compatible with both Windows and macOS will be pleased with FireAlpaca. It provides a great mix of powerful software at no cost. The simple function and features make illustrating extremely easy.
FireAlpaca can be used on even old computers. Thanks to its speed and reliability, users can get ahead in their workflow. With the application, users can access integral digital art tools such as the move tool, hand tools, selection tools, eyedropper, buckets, eraser, pencil, and more.
Shapes and symmetry can also be easily manipulated using pen, gradient, and shape tools. And for users that require a little bit more help with their lines, the Stabilizer tool comes in handy, ensuring that naturally smooth lines are achieved every single time.
👍 Support Us: Subscribe to our channel and help us continue providing these tutorials.
🌟 Regular Updates: We publish how-to videos for FireAlpaca regularly!
🔧 Expert Guidance: Learn FireAlpaca from our professionals and uncover exclusive tips!