Table of Contents
Need to change the size of an artboard in Illustrator?
Like most things in Adobe Illustrator, learning how to edit artboard size Illustrator can either be very simple or very frustrating, depending on your vantage point. The issue here is that most people often make the mistake of approaching Adobe Illustrator from the same direction and assumptions as approaching Adobe Photoshop.
Even though they are similar in some ways, the little intricacies found in both programs make them so vastly unique from one another. If you try to patch over what you learned in Photoshop to Illustrator, you will struggle. These two programs are inherently different, and as such, both demand unique perspectives.
With that being said, changing an artboard’s size within Illustrator may be helpful for many reasons. Sometimes project requirements will change, the client will want a different graphic size, or you may be creating multiple artboards in a single project and need to individually customize the size of each.
Whatever the case, Illustrator makes the process super easy!
Creating an Artboard in Illustrator
If you are familiar with Adobe Illustrator, you already know what an Illustrator artboard is. Simply put, it is like a layer in Photoshop or a page in Indesign. It is an empty space where you can create and showcase design elements.
When creating a new document in Illustrator, you must choose your preferred artboard or canvas size. There are eight presets commonly used:
- Letter: 612 x 792 pt
- A4:28 x 841.89 pt
- Print-Large: 19008 x 8640 pt
- Legal: 612 x 1008 pt
- Tabloid: 792 x 1224 pt
- A3:89 x 1190.55 pt
- B4:5 x 103.81 pt
- B5:9 x 708.66 pt
If you have something more specific in mind, you can edit artboard settings. Maybe you aren't satisfied with your design, or there is too much or too little empty space. Change the artboard size using one of our three methods below.
Option 1: File > Document Setup > Edit Artboards
As with most tasks in Illustrator, there are several ways to change the size of an artboard.
Here’s a quick look at one of the easiest ways!
Follow these simple steps:
- Open your Illustrator project
- Select Document Setup from the tool options bar (or select File > Document Setup from the top menu)
- When the popup window appears, select Edit Artboards. This will activate the handles on your artboard’s edges.
- With the Move tool (Shift + M), drag and drop any of the four corners or sides to the desired size. Hold Shift while doing this if you want to constrain the aspect ratio of the artboard.
In summary, with this method, you will be essentially be following these steps: File > Document Setup > Edit Artboards.
- Pro Tip: You can also press "Shift + O" to accomplish the same action. This keyboard shortcut can also be used in Canvas to change the Artboard dimensions (width, size, shape) and can save you a lot of time and headache.
Option 2: Window > Artboards > Artboard Options
This is yet another option or method you could use to change an Artboard's size in Illustrator. It's quite straightforward (Window > Artboards > Artboard Options).
- Simply go to Windows > Artboards, where an Artboard palette window appears. Once it's appeared, there are two options available to you
- Double click on the Artboards Icon
- Click on the horizontal lines that can be found on the top right-hand corner of the Artboards panel. Once there, click on the lines, and a drop-down menu will appear. Go to the "Artboard Options" menu, and from there, you can change the Artboard settings, including the Artboard size, to whatever you want.
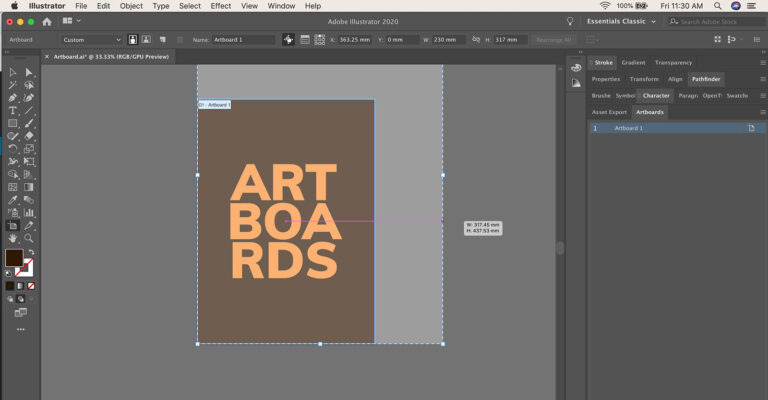
Option 3: Use the Artboard Tool
This is the manual option. To achieve this, you need to:
- Step 1: Start by opening up the Illustrator project you want to resize. Once you open up the projects and before you can change the specific Artboard size, you will see the original or existing Artboard on the canvas.
- Step 2: On the left side of your new document, there's a toolbar panel or a tools panel. Select the "Artboard tool," which bares the symbol "+" at the very top of the page. You could also select this tool using keyboard shortcuts ("Shift + O" for windows and "Command + O" for Mac).
- Step 3: A blue bounding box with anchor points will surround the Artboard at this point. You can then simply hover your mouse over any of the points on this blue bounding box and manually drag it to resize the Artboard. You can simply repeat this process until you achieve the desired results.
If you happen to be working on multiple Artboards simultaneously, you can simply select the one that you want to resize on your workspace using the Artboard tool. After that, it's just a matter of following the above-outlined steps until you achieve the desired results.
Note: If you are new to all this, you can simply make a clone of the existing Artboard by using the Artboard tool. To achieve that, all you have to do is select the tool, then press Option for Mac and Alt for Windows while dragging the desired Artboard.
This action will immediately create an exact duplicate copy of the selected Artboard, complete with all the existing design elements. You don't have to worry about messing up your original artwork.
What Is the Maximum Size of an Illustrator Artboard?
Currently, the maximum artboard size of an Illustrator Artboard is 227 x 227". If your design is larger than this, you can resize it when sending it to print. You can also change the size of multiple artboards simultaneously.
Hold the shift key and select the artboards you need to resize, and then change the value using one of the three methods you learned above.

