
While you may want a gallery or particular objects to move as you scroll, you may have objects you want to remain in a fixed position when a user scrolls through the page, such as headings or sidebars.
Whether you are new to designing on Figma or you are an experienced user, this guide will help you fix an object’s position on the page.
The option to set an object’s position on the page has moved in the recent updates to Figma, and it is now located in the Prototype Tab.
Table of Contents
Overview of Creating a Fixed Position When Scrolling
- Add all the elements to the page with a scrolling frame
- Group any objects that need to stay fixed together
- Select the object you want to remain fixed
- Open the Prototype tab
- Locate the position drop-down under the Scroll Behavior section
- Change the Position to Sticky or Fixed
- Check the Layers Panel
- Click the Present button
- Test the scrolling feature in the Present tab
Step-by-Step of How to Fix an Object’s Position When Scrolling

At the end of these steps, you will have successfully set an object, or multiple objects, to remain fixed in position when scrolling the other elements on a page. This is useful when designing web pages or pages that will be displayed on an app or cellphone screen.
I will demonstrate the process using images sourced from Unsplash.
Add All the Elements to the Page With a Scrolling Frame

Before you fix an object into position, you need to add all the elements you want on the Page. Then ensure that you added all the elements to a frame. This will make all the objects scrollable, but you will change that shortly.
For this example, I have created an image gallery with sidebars that I want to remain in place when scrolling through the images.
Group Any Objects That Need to Stay Fixed Together
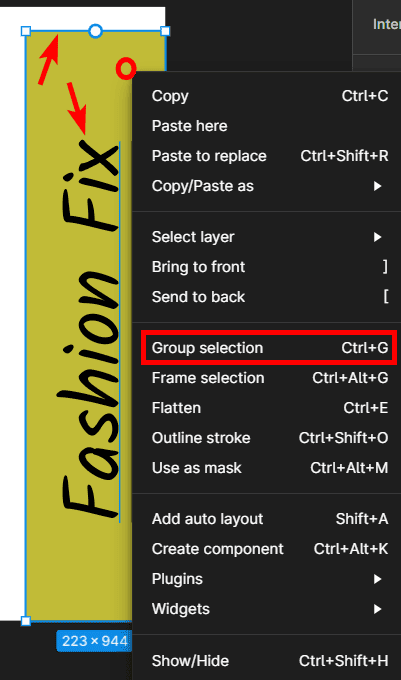
Next, you can make the task easier by grouping any elements that are connected and need to remain fixed in the same place. For instance, my sidebar is made up of a rectangle and text, so I can group each sidebar together, to ensure the text and rectangle both remain in place.
To group objects, select the objects by holding in Shift and clicking on each object, then right-clicking and pressing Group Selection. You can also use the shortcut Control + G on Windows or Command + G on Mac.
Repeat this process on other elements, such as the sidebar on the other side of the page.
Select the Object(s) You Want to Remain Fixed

Now, you can select the object or multiple objects that you want to remain fixed when scrolling. Here I will select both sidebars that I grouped, so simply selecting the two groups ensures that all the elements are selected correctly.
Open the Prototype Tab
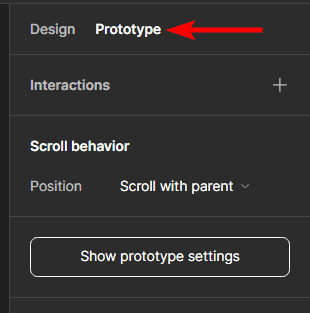
Once all the objects are selected, open the Prototype tab by clicking on the name in the right-hand panel.
Locate the Position Drop-Down Under the Scroll Behavior Section
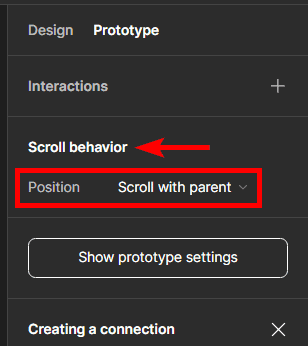
Near the top of the Prototype tab, you will find the Scroll Behavior section, underneath which is the Position drop-down menu. By default, the Position setting will be on “Scroll with parent,” which indicates that the object(s) will move with the rest of the objects on the page.
Change the Position to Sticky or Fixed
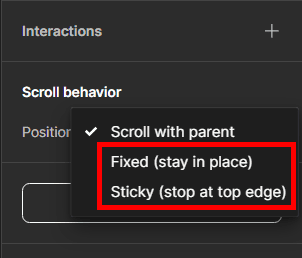
Open the Position drop-down menu and set it to Sticky or Fixed, depending on how you want the object(s) to behave.
Check the Layers Panel

You can see whether all the objects are set to fixed by looking at the Layers Panel. The panel divides the objects on the page into the ones that will scroll and those that will remain fixed.
Click the Present Button
Next, to test the page on a mock-up of the device you are designing for, click the Present button, which looks like a Play icon at the top-right of the workspace.
Test the Scrolling Feature in the Present Tab
The Present tab opens in a new tab in your browser. Here you can scroll using your mouse to check whether the gallery scrolls correctly and the sidebars remain fixed in place.
Tools:
- Figma